Welcome to the first installment of our two-part series on preserving your family history with web-based genealogy tools. In this part, we’ll dive into the challenges my dad faced when using Ancestry.com and how we found a solution to securely store and continue his family tree research. We think you should be able to preserve your ancestry for free. Stick around to the end, where I’ll provide step-by-step instructions for setting up a free web-based genealogy program. Setting up a family tree is easy and fun. Don’t worry if you can’t wait for Part 2; we’ve got you covered with the essentials right here. I want to be objective because I know many people use the most popular genealogy provider online, Ancestry.com, but I have a bit of a bone to pick with them. I will get right to it, then we can dissect it, and I will tell you my solution and how it might help someone else.
This story all starts with a conversation I was having with my dad. My father is elderly, on a meager fixed income on social security, a history buff, and an overall good citizen. In my dad’s later years, he has become highly nostalgic. He always talks about his childhood, our Irish heritage, and how he wants to pass down our family history to his children and grandchildren. I have often asked my dad to please write a book, something to pass on these beautiful stories! Instead of writing a book, my father wanted to track and capture our heritage in a family tree and signed up for Ancestry.com free trial.
According to my father, he found matches that were accurate right away. He also discovered photos, birth certificates, and other documents from Ancestry’s incredible search engines and databases. He could also find and connect with family members we had never met. He quickly passed the free trial time and could not bear to stop and decided to stay on their monthly plan. Unfortunately, after a few months, he ran out of what appeared to be leads to grow his tree further. However, Ancestry had another option, DNA. So my dad got the DNA kit and waited for his results.
Shortly after, my father’s results returned, connecting even more dots for him. He was very excited, and I remember he would tell me about matches and cousins he found and how he was making connections. I did not know much about the program or what it entailed except commercials I heard, but I was happy he was happy. Eventually, though, the matches went stale again. Also, financially, the monthly costs caught up with him, eating into his fixed income and showing an impact on his one credit card.
My dad would share that he did not feel that there was much he could do. He felt trapped because all of his information was there, and by canceling it, he would lose it. He is not technical, and even the lowest tier option was too expensive for him, and the couple of years he was putting this on his credit card had reached a tipping point.
Finally, my dad came to me for help. He told me he could not afford the service and would be distraught if he lost all the time he had put into the family tree. So, we faced a dilemma. How could we download the family tree? What about all of the media? Let’s put it in a safe location where he can easily open it in a program and continue his work, preferably for free; can we?
This is where I became upset with Ancestry. They know this would happen to people, and I also think that my dad’s feeling toward family history is a typical shift in older age. There is no easy way to retain all the incredible database information. You can download the GEDCOM file, but much of the data is not easily parsed by other programs; there is a ton of cleanup from proprietary data sources linked in the data file. Also, if you did not add all the text-based hints, they don’t download. Additionally, you can’t access the links to the documents you find in your searches once you cancel, and the images don’t download; they belong to Ancestory’s repositories. OH… and also, if you want ancestry to hold on to your info, which they use to help other subscriber tree searches, they have a minimum monthly payment for that.
We figured out a way, and it is 100% free. To support ancestry for free, we self-hosted a virtual environment in Oracle, installed docker, a SWAG server, installed an open-source web-based genealogy program, created a domain name through [Duckdns.org](http://duckdns.org/), and started uploading the GEDCOM files and SNIPs of the images he found on Ancestry, before disconnecting the service. This may have sounded all foreign to you: SWAG, Docker, etc… but it is all straightforward and really not hard for someone willing to dive into a bit of the command line and copy-paste commands. My goal is to provide you with some background and easy copy paste commands to do this yourself.
Follow these steps to set up a free Oracle Cloud account and virtual machine for hosting a web-based genealogy program and storing family tree data. This allows you to retain all your data even if you decide to cancel your subscription to a genealogy provider like Ancestry.com. This virtual environment will allow you to host your ancestry for free.
Setting up Your Free Tier Oracle Cloud Account:
- Go to Oracle Cloud Free Tier.
- Enter basic account information and complete the registration process.
- Solve the captcha, verify your email, and input a valid credit card (no charges will be incurred).
- After account creation, sign in and select your interests.
- You’ll be taken to your cloud dashboard, and free tier services will be indicated.
Creating a Virtual Machine (VM):
- On the cloud dashboard, click “Compute” and select “Launch a VM instance.”
- Name your instance and click “Edit” under “Image and Shape.” -I named mine “genealogy server”
- Change the image to Ubuntu and select the desired shape (e.g., Ampere processor with 2 OCPUs and 2GB of memory). – this is what I selected and runs great.
- Ensure you stay within the free account tier limits mentioned in the guide.
Setting up SSH Keys:
- Download Putty from putty.org (if you don’t have it already).
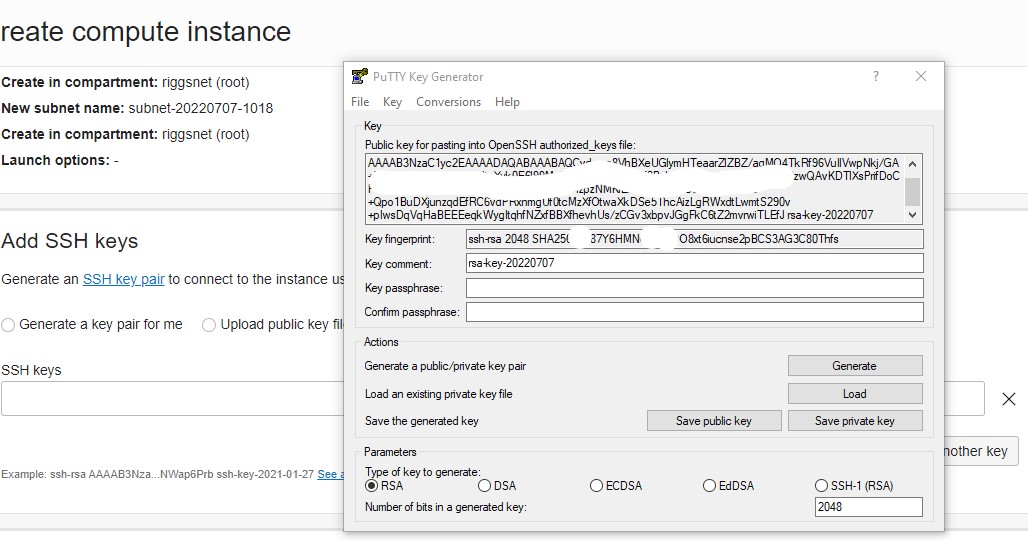
- Open PuttyGen and generate an SSH key pair. Save both the public and private key files.
- Copy the generated public key and paste it into the “Add SSH Keys” section.
- Leave other options as default and click “Create.”
 Accessing Your VM via Putty:
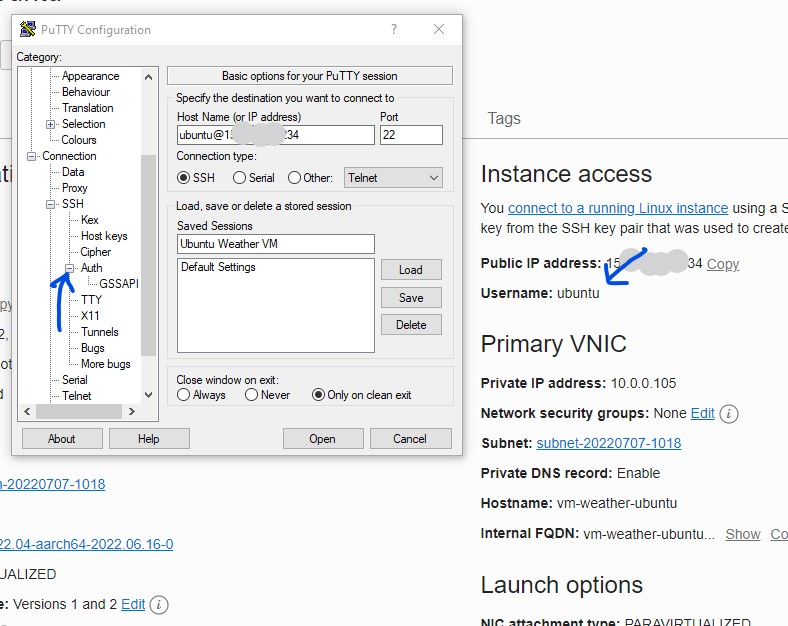
- Oracle Cloud will create your VM, and when it’s ready, it will display the public IP address.
- Open Putty (not PuttyGen) and enter the provided username and IP address in the “Host” field (e.g., [email protected]).
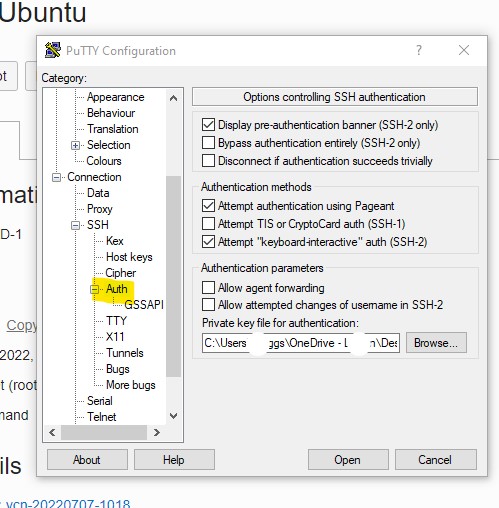
- Under the SSH section, click on “Auth” and browse to upload your private key file.
- To save this configuration, go to the “Session” category, enter a session name, and click “Save.”
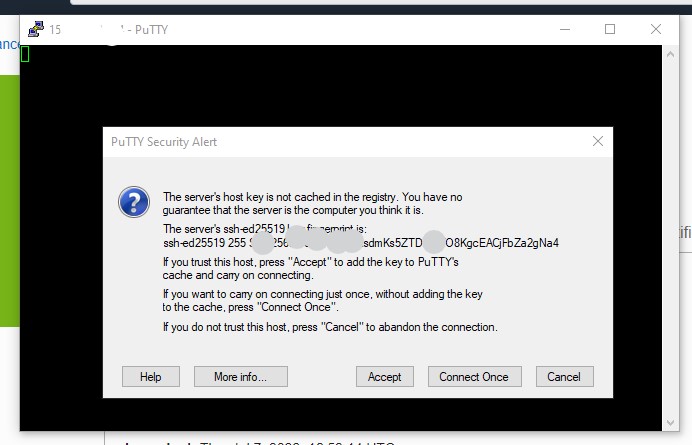
- Click “Open” to launch the session. Accept the security alert, and you’ll be logged into your VM.
 Updating Your VM:
In the terminal, run the following commands one at a time to ensure your OS is up to date:
 Docker is a tool that allows you to create, run, and manage applications in containers. A container is like a lightweight virtual machine that includes everything needed to run the application, such as code, libraries, and dependencies. Docker makes it easy to create and deploy applications in a consistent and portable way, meaning you can run the same application on different computers without any issues.
In layman’s terms, Docker and Docker Compose help users create and run applications in a way that is consistent and easy to manage. They allow you to build and deploy your applications quickly and efficiently, without worrying about compatibility issues or complex infrastructure. We will use docker so that I know the SWAG and Database instance we use will work on your VM like it does on mine!
Steps to Install Docker and Docker Compose
Step 1: Update Package Repository:
 While purchasing a domain name is one way to go, there’s a free and convenient alternative – DuckDNS. DuckDNS is a dynamic DNS service that allows you to create your own custom domain for free.
Step 1: Create a DuckDNS account
To get started, open your web browser and navigate to the DuckDNS website. You can reach their website by typing the following URL into your browser’s address bar: https://www.duckdns.org/
Step 2: Sign Up for an Account
Upon arriving at the DuckDNS website, you’ll need to sign up for an account. Creating an account is quick and straightforward. Look for a “Sign Up” or “Create Account” button, and click on it.
Step 3: Create your Domain
DuckDNS provides clear and easy-to-follow instructions to create your custom domain. You will need to provide the Public Static IP of your Oracle VM you set up earlier. you will be able to see your Public IP shown on your instance page.
Step 3.1: Choose a Domain Name
You’ll have the opportunity to pick a custom domain name for your website or application. This name will become the prefix of your DuckDNS domain. For example, if you choose “mysite,” your DuckDNS domain will be “mysite.duckdns.org”
That is it for this part! You now have your very own custom domain with DuckDNS. You will be able to access your family tree website using the domain name you’ve set up, followed by “.duckdns.org.”
Your DuckDNS domain is now ready to use and we will add this to the docker-compose.yml file we will be creating later to work towards setting up Webtrees; which is the open source site that hosts your ancestry for free.
 Opening up ports will allow you to navigate to your webserver. Oracle keeps all the ports locked down to keep your VM’s safe, so will will need to open up specific ports to get to your web server.
- Steps to Open Ports:
- Log In to Oracle Cloud Console:
- Go to the Oracle Cloud Console and log in to your Oracle Cloud account
- Access Instance Details:
- Click on the “Compute” tab and choose “Instances.”
- Select the instance for which you want to open ports.
- Navigate to Security Lists:
- Under the “Instance Information” tab, scroll down to find the “Primary VNIC” section and click on the subnet link associated with your instance.
- Access the Default Security List:
- In the “Subnet Details” section, locate the “Security Lists” section and click on the link for the “Default Security List” related to your instance (there should be only one).
- Add an Ingress Rule:
- Within the “Default Security List” page, click on the “Add Ingress Rule” button.
- Configure Ingress Rule:
- In the “Source Type” section, keep it as “CIDR” and input “0.0.0.0/0” in the “Source CIDR.”
- For “Source Port,” set it to “All,” and in the “Destination Port Range,” input “80,443.”
- The TCP protocol should already be selected.
- Click on the “Create” button.
- Provide a Description (Optional):
- If desired, type a description in the “Description” box.
What It Does:
By following these steps, you’ve successfully opened ports 80 and 443 on your Oracle EC2 cloud instance. This allows http and https network traffic to reach your VM hosting your family tree application.
Step 6: Paste Configuration
Paste (by right clicking your mouse – after you have copied the below code) the following configuration into the Docker Compose file. This configuration includes services for MariaDB and SWAG, which is the core component for securing your web applications.
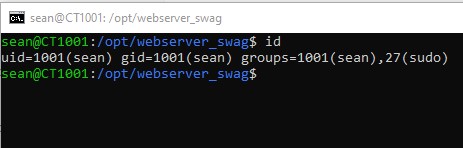
You are also going to need additional information. Find your PUID and PGID by typing “id” in the terminal of your server (you should be ssh’d in via putty).
 For this section you will also need your duckdns URL that you created earlier.
Note: if you are a docker compose wiz, notice we are not using the command: docker-compose. v2 of Docker Compose allows us to enter the command without the “-”
Your terminal will light up with action now! you will see it pulling images and creating containers .. then … it will be back to a prompt … signifying it is done. Before getting too excited, let’s check and make sure our containers are running. Remember, we will have 2: Our Spaghetti and our side of Garlic Bread 🙂. In your terminal prompt run: sudo docker ps it should look like the following image:
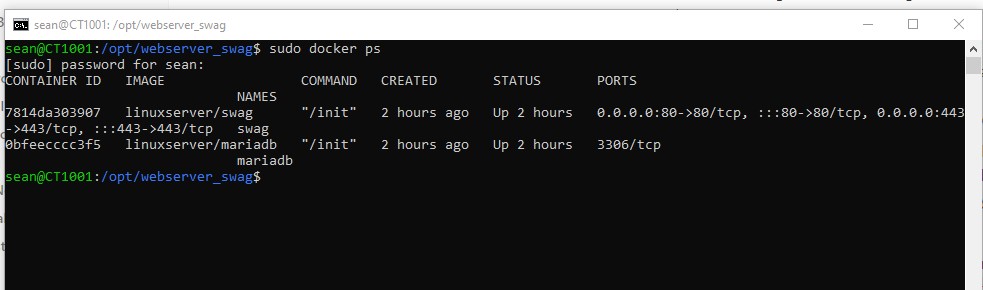
So, in simple terms, this image above shows you that there are two containers running on your computer. One is responsible for web security (SWAG), and the other is a secure storage space (MariaDB). They’ve been working for about 2 hours, and their doors (ports) are open for communication with your computer. Everything seems to be running smoothly!
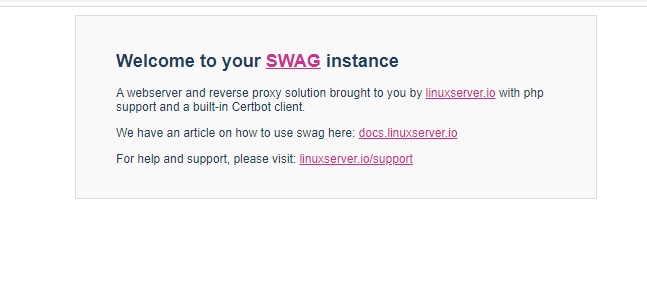
Now let us try and navigate to our new web server! It is finally time to open a browser and navigate to domain name you created on duckDNS. Go ahead and try that now. IF you are successful, you should be greeted with the following image:
Thank you! That sounds great! I have to try it.
Fantastic! Any issues feel free to reach out 🙂
Quickest way to reach out for a response is via [email protected]