Huginn – Installation and Configuration

Huginn LogoWait, Wait, Wait … it’s not what you think. Okay, IT’S EXACTLY WHAT YOU THINK! Internet BOTs automagically pull data from sites, employing your own minions to search for data and bring it back to you in a way you want to see it. Even having these agents perform actions on your behalf. When I started messing around with this project, I felt like some cool cyber-net sleuthing agent … like Jason Bourne, well, Jason Bourne with a laptop. Jason Bourne, with a computer and hours learning strange things on YouTube and Google.

So I found a unique open source project called Huginn. Named after Odin’s Ravens, Huginn allows you to program “agents” to go out to the internet, find, acquire, and act on information it was told to look for. Huginn does precisely what you think “bots” would do. This project has been going on for a long time, I see posts about it here and there, but really, I can’t believe it’s not being employed by tons of people out there … well maybe it is, but I don’t find a ton of information on it.

…two ravens named Huginn and Muninn sit on Odin’s shoulders. The ravens tell Odin everything they see and hear. Odin sends Huginn and Muninn out at dawn, and the birds fly all over the world before returning at dinner-time. As a result, Odin is kept informed of many events.”

-Sacred Texts, The Prose Edda, Gylfaginning

I think this is going to be a long Blog.   ** Sean from the future here: “yes, way too long, so I am splitting my post into 2 parts.” In my first post, I will concentrate on sharing with you use cases, what Huginn can do (so far that I have found), and how to set it up on ARM, aarch64, or x86 Linux distros.

In my second post (linked here), I will show you excellent websites to get idea scenarios, share my modified scenarios and explain a bit of the JSON, XML, HTML, and formatting I used and learned along the way. Additionally, I will share references and sites of some people who unknowingly helped me get this far. Finally, I will also leave JSON files of the scenarios I am using so you can use them as well, importing them into your Huginn instance and changing the variables to fit your needs.

What is Huginn , and What Are Some Use Cases
So what are some use cases for this Agent Network? I think the best answer to this would be that we can define it as it is EVER growing. However, I will provide some of the use cases I am using. Also, I will share resources to an ever-expanding scenario library that is publicly shared. Huginn comes with default scenarios ready for deployment on your instance with some easy changes to fit your need, location, or destination. Those Use cases include a weather API forecaster that sends notifications of rain or weather in your area. Also, it consists of a website agent that monitors for changes in movie trailer updates and a very “heady” science comic strip. My other specific use cases, which I will also be stepping through the setup on later, include: Coronavirus News Agent: This agent scans feeds from the CDC, WHO, and local sources for news on Coronavirus (and other diseases). I have adapted the scenario from The Doctor and updated it to remove some broken WHO links, update receiving emails, and update keywords I wanted to be scanned. Weather Forecaster for Morrison, CO: I used this scenario to replace the default weather scenario with the Huginn instance. The included Huginn instance has you acquire APIs from Weather Underground or DarkSky… DarkSky is not issuing APIs anymore, and Weather Underground wants you to have a WU system to activate. This scenario pulls the National Weather Service URL for a specific location, pulls API data from the URL provided, formats a weather report, then sends it to the user. This scenario is adapted from the Doctor’s designs as well. Another Scenario I adapted from .. yes … the same programmer, is called Shake, Rattle, and Roll. I did not update the name, as the term is fantastic. These agents monitor USGS seismic activity in your chosen locations, format the information from the USGS report, and send contacts (predefined) a statement of human-detectable earthquakes in selected areas. This is my favorite one… just something about knowing this can be monitored in this way gets me excited about the potential for this open-source project! I will also cover a Twitter Keyword Stream Monitoring agent using a Twitter OAUTH and developer API (that anyone should be able to get). This scenario monitors Twitter streams for specific keywords, then uses a peak detector agent to trigger notifications to recipients when exact keywords see an unusual increase in tweets. Huginn’s creator had this one tucked away. I will close out with an RSS feed scenario that monitors new postings on a Blogsite without subscribing and sends the agent user a notification. This scenario looks at the XML feed of a particular blog site, then converts it to JSON by a data output bot and is scrubbed for changes by a website agent. This is my first from-scratch scenario.  

Installing Huginn

Covering MySQL, Docker, docker-run, docker-compose

If you skipped to just installing Huginn from the table of contents, I get it… I will get you started with sub-section links and get out of your way! However, some may need to see the dependencies and install the prerequisites.

Prep your Linux System

The Linux distro you use should not matter, but your container image depends on whether you install it on x86 or ARM architecture. I have tested installing and using Huginn on Ubuntu on AMD and ARM processors. I also tried on Raspian OS. If you want to try working with Huginn but if you don’t have any room on a spare machine, you can spin this up on a virtual machine (VM).

I am running Huginn on a VM on Oracle Cloud, and I use their free tier (ampere ARM processor, four vCPU, 24G RAM). I am using Ubuntu 22.04 on aarch64. Just remember to open port 3000 to get to the Huginn application from the web (set up your authentication right away!). If you want to try a VM through Oracle, I have instructions on how to do that here.

If you’re running a VM, you would have probably set up SSH to log in using public/private keys. That is okay, but you will need to set your root password. Ubuntu, by default, does not have a root password set up.

Install MySQL Server

Huginn is going to need a database to store your data. I used MYSQL. This is a relatively quick process and can be done by the following:

  • Connect to your server via SSH.Login with your username and password.
  • Run the following command:
    • sudo apt-get install MySQL-server
  • Follow the prompts to install MySQL (enter Y for ‘Yes’ where necessary).
  • You will be prompted to set a password for MySQL.
  • After it has been completed, you can verify that MySQL is installed by running these commands:
    • To verify that MySQL is running:
      • service --status-all
    • To check the version of MySQL installed:
      • apt-cache show MySQL-server | grep version

Congratulations, you are now running MySQL Server and are ready to install Docker!

If you do not install a database like MySQL, you will lose all of your data if you restart your container. I did this and lost 30 agents. … The Huginn wiki clearly tells you this as well… I failed to listen.

Install Docker

Installing Docker will be another fast install. SSH into your machine or open a terminal and run the following:

sudo apt install docker.io

Docker should now be installed, the daemon started, and the process enabled to start on boot. Check that it’s running:

sudo systemctl status docker

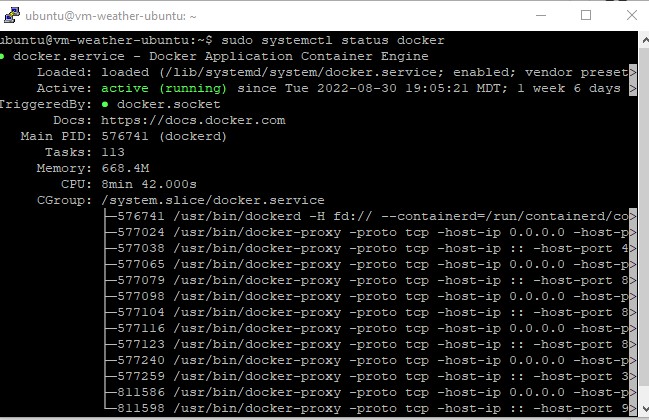
The output should be similar to the following, showing that the service is active and running:

systemclt status docker

Executing the Docker Command Without Sudo
(Optional - but saves frustration)

The docker command can only be run as the root user or by a user in the docker group. If you attempt to run the docker command without adding sudo or being in the docker group, you’ll get a “cannot connect to daemon error.”

To avoid typing sudo whenever you run the docker commands, add your username to the docker group:

sudo usermod -aG docker <username>

Log out then back in to have the changes take effect, or perform a switch user (to same user name):

su - ${USER}

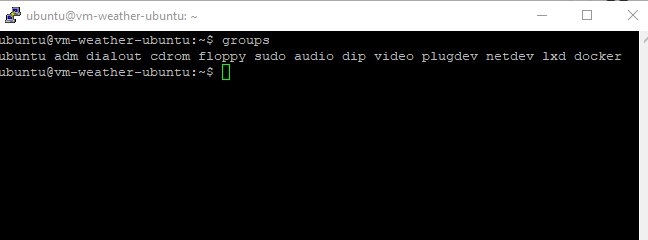
Confirm that your user is now added to the docker group by typing:  groups

admin groups

Install Huginn via docker-run

Okay, now that we have Docker and a Database Server, we can finally install Huginn. We need to create a volume that we will tie to our database location. We do that by entering the following:

docker volume create huginn-data

Now let’s create a container with a restart policy, open up ports (on the docker network), attach the container to the volume/database location, and specify the docker image to pull from docker hub:

docker run -d --name huginn --restart=on-failure:5 -p 3000:3000 -v huginn-data:/var/lib/MySQL mjysci/huginn:arm32v7

For ARM32/aarch64, I used docker image mjysci/huginn:arm32v7 instead of ghcr.io/huginn/huginn, which will not work on ARM/aarch64. If running on Linux AMD/x86 infrastructure, use ghcr.io/huginn/huginn for your docker image.

running containers

Once you see your docker container up, you can view information on the containers running by issues command:

docker ps

Huginn Login Screenyou should be able to navigate to your IP address and port 3000 in your browser window and be brought to the Huginn login screen. (remember to open up this port on your firewall if on a VM: Oracle, Azure, AWS, GPC, etc…).

Install Huginn via docker-compose *Recommended Install*

Using the images above and the already provided docker-run commands from the Huginn team, I sat down and put together a docker-compose file for fast deployment (thank you https://www.composerize.com/). The YAML file includes (found here on my GitHub):

  • Pre-stated variables.
  • A separate docker network.
  • A containerized database that keeps you from having to install MySQL natively on your machine.

You can either clone the repository or copy the file and follow the instructions below.

1st Option: git clone

git clone will download it into its own folder. Do not run docker-compose up -d in this folder, it looks messy. Either rename the folder to huginn or move the file to a newly created huginn folder. This process will snag the readme and any other file added to the repo.

git clone https://github.com/SeanRiggs/Huginn-Docker-Compose_AMD_X86_ARM.git

Recommended: Or CD into the directory you want to install huginn in and use wget to pull the single docker-compose file:

wget https://github.com/SeanRiggs/Huginn-Docker-Compose_AMD_X86_ARM/blob/main/docker-compose.yaml

2nd Option:

Download the file from GitHub and copy it into a new directory named huginn.

Example: make a directory you want to install your docker-compose containers.

mkdir huginn

CD into that directory

cd huginn

Copy docker-compose.yaml into the directory, once copied, open the YAML file with nano.

sudo nano docker-compose.yaml

docker-compose example

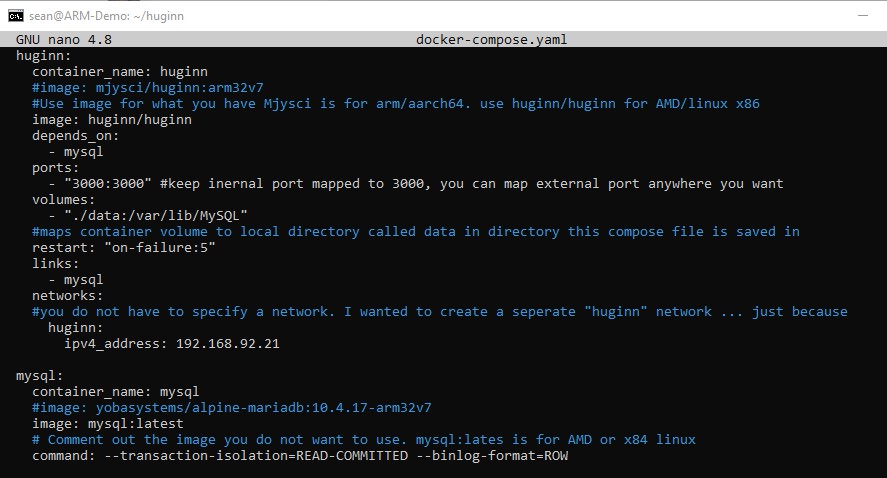
Ensure that you comment out the images you are not going to use for your architecture. Uncomment the images in the containers that match your architecture. The compose file is preset for AMD – x86 Linux. Adjust for ARM/aarch64. Validate before spinning up your container.

Huginn Container:

Linux x86/AMD

#image: mjysci/huginn:arm32v7 
image: ghcr.io/huginn/huginn

ARM/aarch64

image: mjysci/huginn:arm32v7 
#image: ghcr.io/huginn/huginn

MySQL Container:

Linux x86/AMD

#image: yobasystems/alpine-mariadb:10.4.17-arm32v7
image: mysql:latest

ARM/aarch64

image: yobasystems/alpine-mariadb:10.4.17-arm32v7
#image: mysql:latest

docker compose
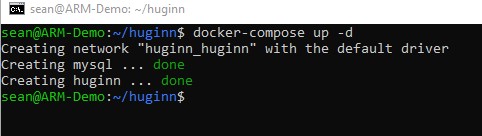
The downloaded and updated docker-compose.yaml file should be ready to go in the directory you chose for it (i.e., huginn). The next step is to spin up your containers using docker-compose and start the docker daemon:

docker-compose up -d

You should see the images download and containers create like the following:

bringing up the docker-compose containerlist your docker containers and take a look:

running containers

docker ps

check your docker network:

docker network ls

docker network lsIf there were any issues following the docker-compose steps, please follow this link to my GitHub FAQ. If the FAQ does not resolve your question feel free to leave me a comment or raise an issue on GitHub directly.

Time to Log In!

So the app is installed, correct? If so, and you’ve gotten this far, you should be able to navigate to <your IP Address>:3000 and be taken to the huginn login screen. Immediately log in with your default username and password: admin/password, and change your password under account settings. While you’re in there, update your email address as well. Updating your email address does not activate it for use at this point but keeps you from having to edit it later after we set up your email in the .env file.

Now that you are logged into huginn via your browser look around. The user interface is sleek and very easy to navigate. As you create agents and scenarios, you will start to fill up these screens. Check out the default scenarios and diagrams to see how the agents link together.

Configuring Email

You will probably want to set up an SMTP or email service so that you can receive or send notifications to specific email addresses or reset account access from lost passwords. I will give you an example of how I did this with my Gmail account but adjust it as needed for other email providers you might want to use (Sendin Blue, Outlook, etc…).

To input our email settings, we will need to console into our huginn Docker container as the root user. We are assuming that your huginn instance is running and it should be to get into the container:

docker exec -u 0 -it <container_ID> /bin/bash

We needed to be the root user because we also needed to install nano so we could write to our .env file. So, once logged into your container, run the following:

apt-get update
apt-get install nano 

Once nano is installed, we can open up our .env file in our nano editor. Input the following:

nano .env

Scroll down to the email/SMTP lines and change your email and password.

env edit for smtpIf you have GMAIL, you probably have 2-factor authentication and will need to give your application its own password. This is simple. Navigate to your google security settings and add huginn as an authorized application. You will receive an application-specific PW you will place into your .env file.

GMail App PassAfter you have made the necessary changes in the .env file, you need to commit the changes by pressing CTL+X, then Y for yes, then enter to save over the existing file.
now exit the container:

exit

Now restart the container

docker restart <container_ID>

Now your email should be all set up! We will test this in a default scenario shortly.

Using a Default Scenario

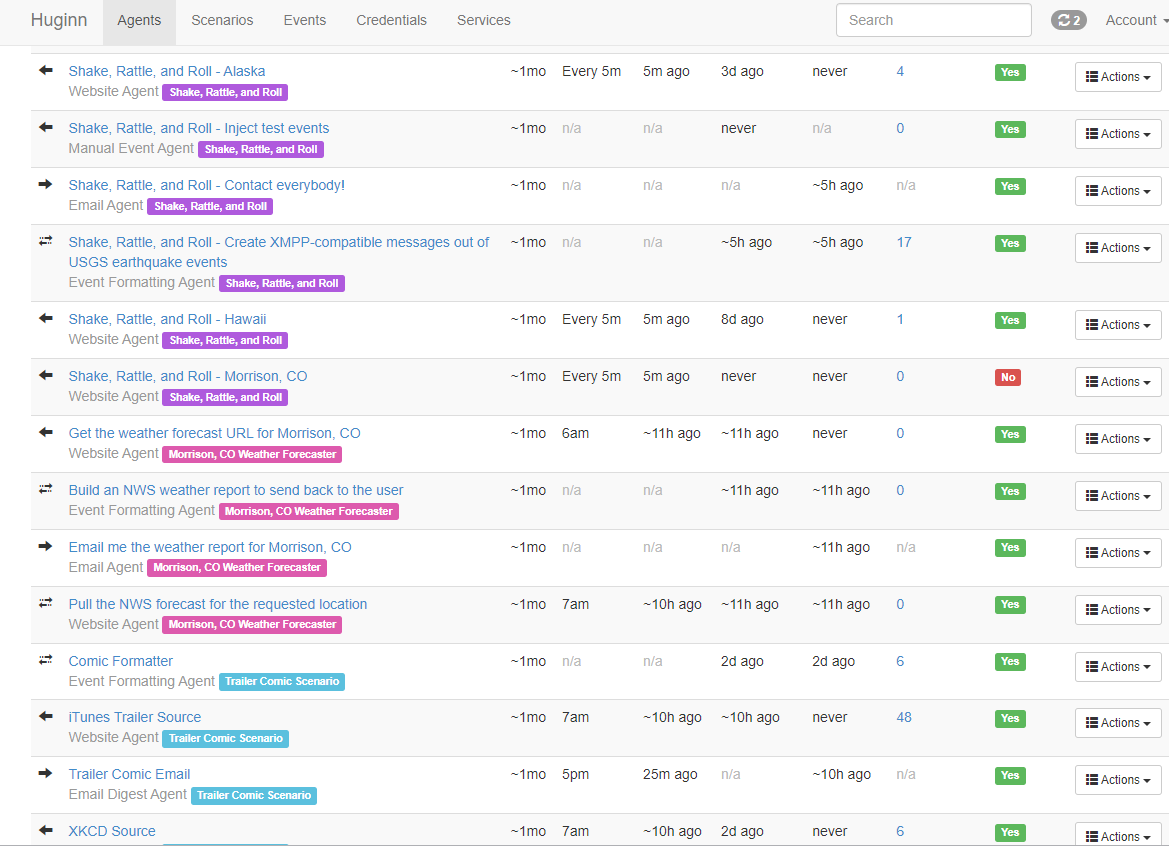
Logging into the GUI of huginn, you are greeted immediately with a “Welcome to Huginn” screen. Along the application’s top are navigation links that will take you to Agents, Scenarios, Events, etc. Navigate to Scenarios.

Scenario Application example
Note that the Default Scenarios was renamed to: Trailer Comic Scenario

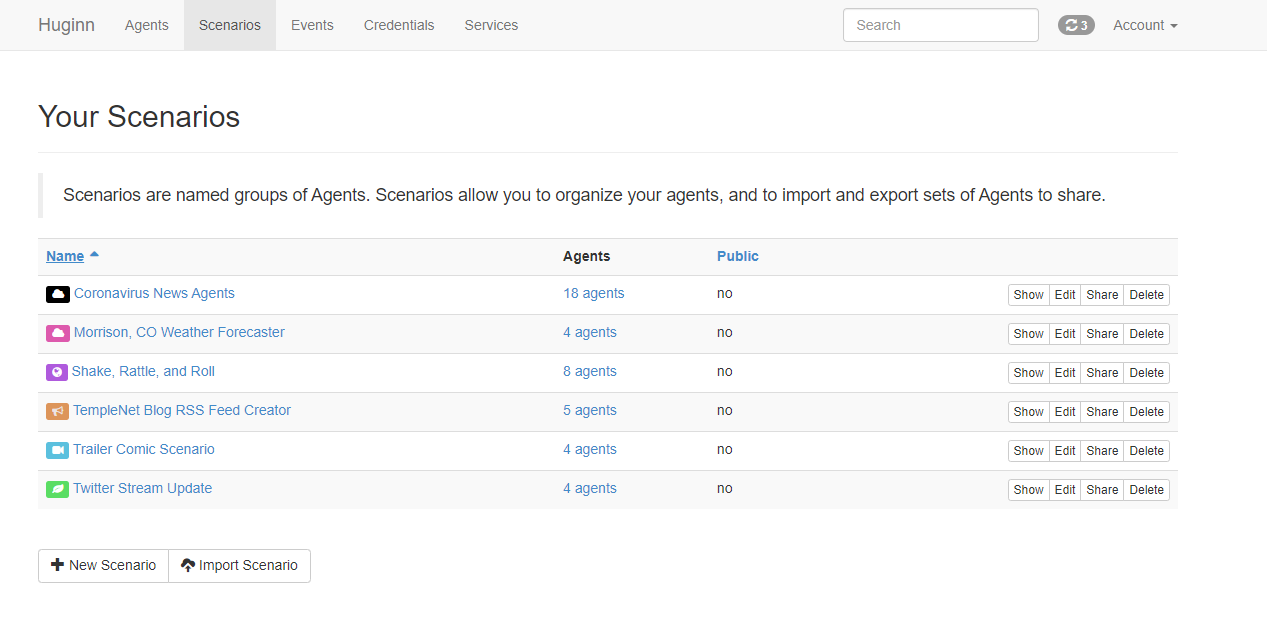
Huginn is preloaded with a couple of scenarios that you can work with. I have removed the weather demo scenario from my instance because, as of this posting, you needed an API from WeatherUnderground or DarkSky; neither provided new API keys/accounts. WeatherUnderground will create an account for you if you have one of their purchased systems. However, I did keep and modify the XKDC Scenario.

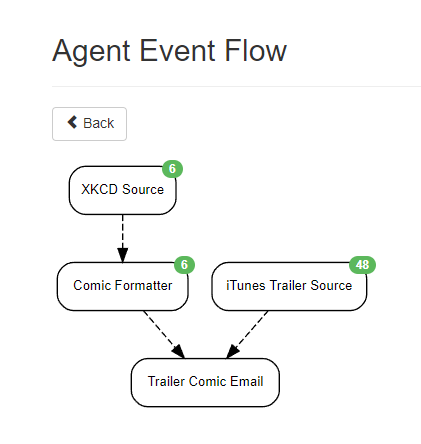
The XKDC Scenario comprises agents that scrape a website for a cool physics comic and from Apple’s iTunes trailer RSS feed for new movie trailers. The data from the comic site is then pushed to a format agent. The data formatting agent receives the information from the “XKCD gathering” agent and formats (cleans up) the scraped data into a friendly design and is then sent to the email agent, along with any new trailers from the RSS feed from iTunes. It would be worth noting that the data sent is only recently changed information. The agents are set to report data that changes after being checked, so you don’t get the same info every day.

XKDC Diagram Flow

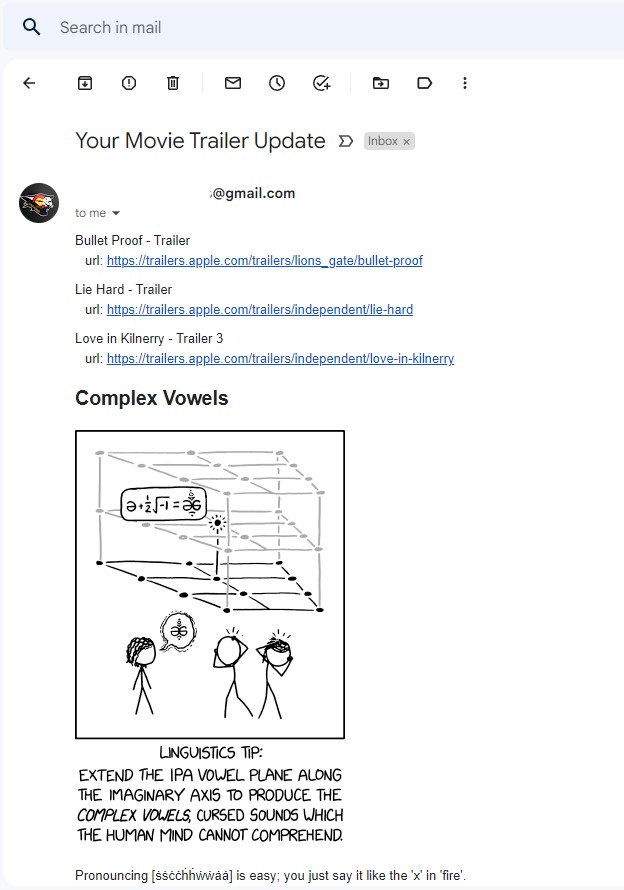
When the email agent receives the expected data from the other agents, it comprises a predefined message. Then, the compiled results are sent to recipients added to the options section of the agent, or if none is specified, the agent will email the digest at a scheduled time to the default email on the account.

I kept, tweaked, and renamed this agent my “Trailer Comic” scenario. below is an example of the email I have sent to me nightly. I will also post the JSON with my updated agents should you wish to modify it for yourself. Link to JSON File for Scenarios.

Trailer Update Email

Organizing Scenarios and Agents

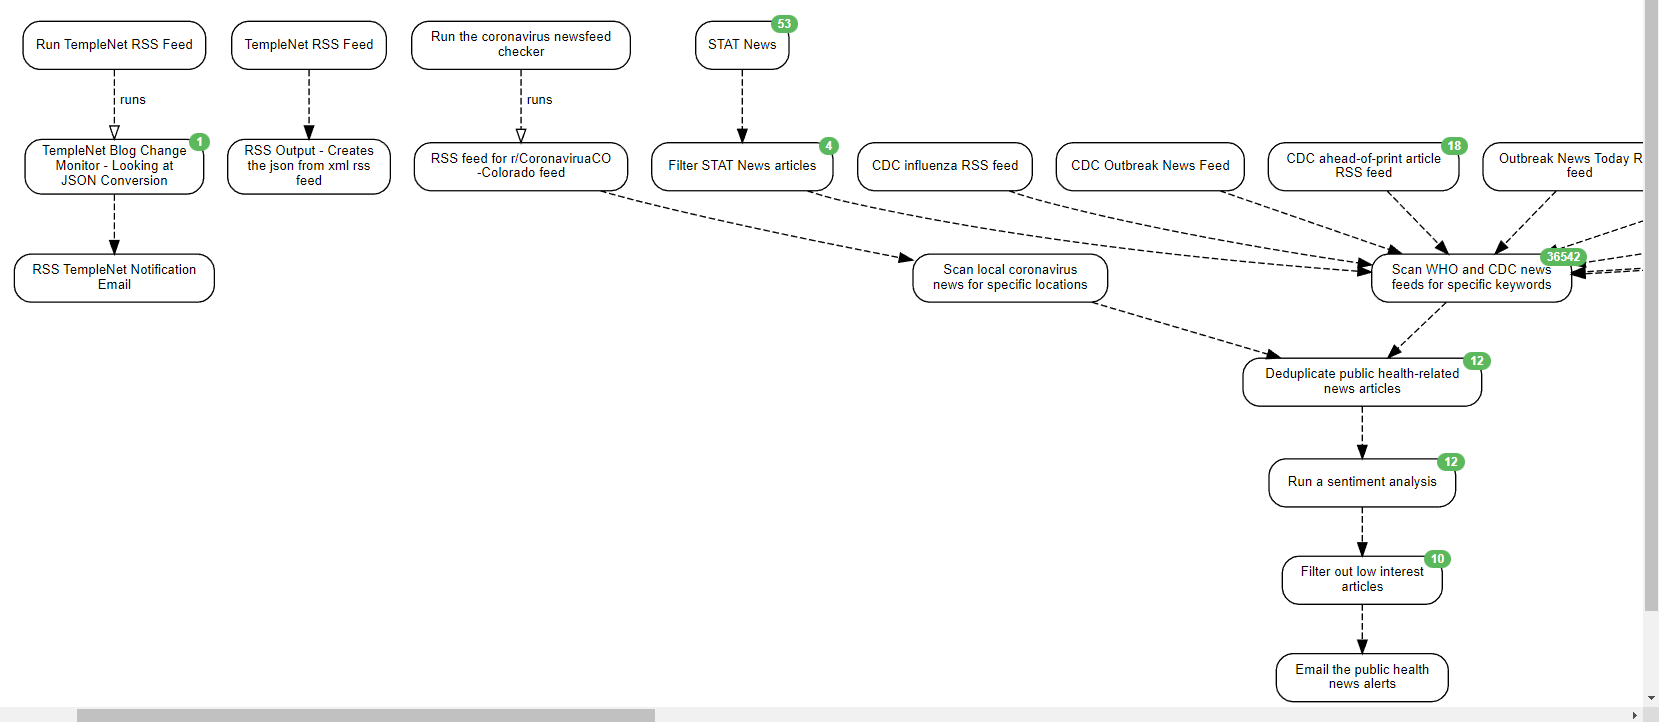
Following a recommendation from The Doctor’s blog, I have organized each agent into their own respective scenarios. This is important, especially if you are like me and want to have a bunch of agents doing a bunch of things. Your diagram will be confusing if all your agents are grouped into one scenario. Any troubleshooting will be complex, and deleting agents that may not seem needed anymore may affect another feeder or receiver agent you forgot it was using.

Here is an example of my diagram and Agent pages:

Scenarios DiagramAgents Pic

Conclusion

Now you have Huginn installed and configured to begin scouring for information on your behalf. So, what next? If you are me, you look around for posted example scenarios and craft them into your own. Then maybe you start making your own automation ideas come to life. A little IFTTT or home automation, maybe?

Check out part 2 (coming soon) of Huginn, where I will review some of my modified scenarios from various resources and show you how to set up services like twitter_auth to push and pull data from your Twitter feeds.

3 thoughts on “Huginn – Installation and Configuration

  1. Ezzy says:

    This was a great post for a really cool idea. Thanks for sharing! Looking forward to part 2!

    Reply
  2. Holzwurm says:

    Thank you for this guide! It is easy to start the container, but on every restart of containers all the data is lost. Do you have any Idea to solve this?

    Reply
    1. Sean says:

      Hi there,

      Yes, you must map a persistent volume to your container on your local network. This is simple.

      for example, create a docker volume:
      docker volume create huginn-data

      Then map the volume when you spin up the container (example using arm32 image):
      docker run -d –name huginn –restart=on-failure:5 -p 3000:3000 -v huginn-data:/var/lib/MySQL mjysci/huginn:arm32v7

      OR you can add volume mapping to your docker-compose.yaml file:

      volumes:
      – “./data:/var/lib/MySQL”
      #maps container volume to local directory called data in directory this compose file is saved in
      – “./huginn:/app/huginn”
      #This will create a new volume called huginn that is stored in a local directory called huginn (relative to the location of the Docker Compose file) and is mounted to the /app/huginn directory in the huginn container.

      you can see example of docker-compose.yaml here:
      https://github.com/SeanRiggs/Huginn-Docker-Compose_AMD_X86_ARM/blob/main/docker-compose.yaml

      Reply

Leave a Reply

Your email address will not be published. Required fields are marked *

This site uses Akismet to reduce spam. Learn how your comment data is processed.